
Understanding Excavator Controls
What Is an Excavator?
An excavator is a piece of heavy machinery built around a rotating upper structure, a boom, an arm (the stick) and a bucket, usually travelling on tracks but also available on wheeled undercarriages, used for digging, lifting and moving material. For the full breakdown of how the machine is built and what it’s suited to, see Quotor’s guide to what an excavator is. This guide covers what comes after that: the controls, the pre-start checks and the technique needed to operate one safely.
Main Excavator Controls
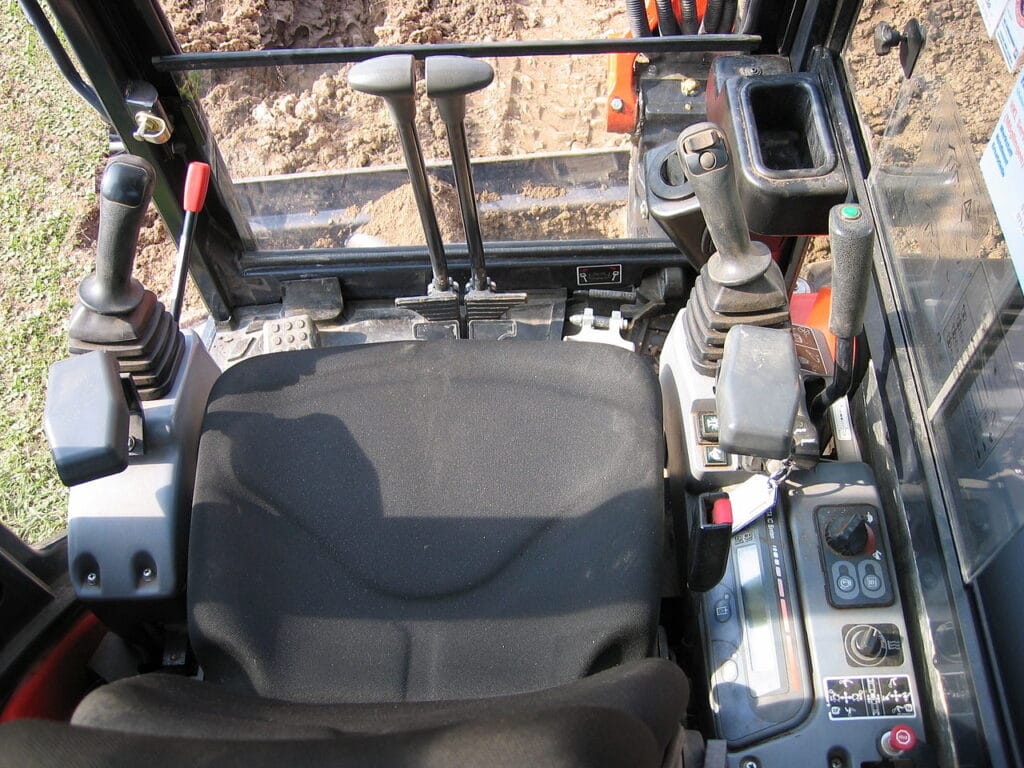
Every excavator, whether it’s a compact mini excavator or a large mining-class machine, works the same four movements: boom, stick, bucket and swing. Two joysticks, the cab’s primary hand controls, split these four movements between them, so each lever handles two functions. Travel is separate, controlled through foot pedals or hand levers rather than the joysticks. A throttle sets engine speed, and a safety lock lever near the cab entrance disables all hydraulic controls when engaged, to prevent unintended movement while entering or exiting. Quotor’s guides to the parts of an excavator and operating a mini excavator cover both in more depth, including where technique differs on the smaller machine.
ISO vs SAE Control Patterns
Which joystick controls which function depends on the excavator’s control pattern. Two patterns are in common use, ISO and SAE, and a machine set to one feels backwards to an operator trained on the other. The left joystick controls the swing in both patterns, and the right joystick controls the bucket the same way; only the joystick that controls the boom and stick swaps hands. Naming conventions vary across the industry, so check which pattern is in use rather than assuming; some excavators allow it to be changed using a selector located elsewhere on the machine.
| Function | ISO Pattern | SAE Pattern |
|---|---|---|
| Left joystick left/right | Swing | Swing |
| Left joystick forward/back | Stick | Boom |
| Right joystick left/right | Bucket | Bucket |
| Right joystick forward/back | Boom | Stick |
| Travel | Pedals / levers | Pedals / levers |
Always confirm the selected control pattern from the machine’s cab markings or operator manual before operating.
Pre-Operation Excavator Checks
Walk-Around Inspection
Before climbing in, walk the full perimeter of the machine. Check the tracks and undercarriage for damage, check the bucket and attachments for cracked welds or worn teeth, and look over hydraulic hoses and cylinders for leaks. Confirm the ground around the machine is clear of people, and note construction site hazards nearby, trenches, overhead services or soft ground, which affect excavator positioning.
Fluids, Hydraulics and Undercarriage Checks
Check engine oil, coolant and hydraulic fluid against the sight gauges, and check fuel before starting rather than partway through a shift. Inspect the undercarriage for correct track tension and grease points that need attention, and check air filters and hydraulic hoses up close for damage the walk-around might have missed from a distance. A machine that isn’t in good working condition on these points is more likely to fail mid-task than at the point of inspection, which is why this check happens before the engine starts.
Cab, Controls and Safety Systems
Wear the PPE your site requires, hi-vis clothing, a hard hat and safety boots at minimum, before climbing in. In the excavator cab, adjust the seat and mirrors before fastening the seatbelt, and test the horn, lights and reversing camera. Confirm the safety lock lever works and the gauges respond once the engine starts. An excavator doesn’t require a specific national High Risk Work Licence, but employers must ensure the operator is competent for the machine and task; Quotor’s guide to excavator licensing covers the training, Statement of Attainment and VOC requirements that may apply.
How to Operate an Excavator
Starting and Positioning the Excavator
Start the excavator following the manufacturer’s prescribed start-up sequence for that specific model, and let the hydraulic system reach normal operating temperature before working under load. Lower the safety lock lever to activate the controls, and position the tracks so the undercarriage sits stable and level before beginning any digging or lifting work.
Driving and Steering
Learning to drive an excavator starts with the travel controls: two pedals or hand levers, one per track, operating independently of the joysticks. Pushing both pedals forward will drive the excavator forward, pulling both back reverses it, and pushing one further than the other turns the machine by slowing or reversing one track relative to the other. The idler wheels usually sit at the front of the tracks and the drive sprockets at the rear. Travel direction follows the undercarriage, not the way the cab happens to be facing, so if the upper structure has been rotated, the machine can travel opposite to what’s expected. Identify the drive sprockets before moving off.
Operating the Boom, Arm and Bucket
Smooth digging technique comes from combining boom, stick and bucket movement rather than working one axis at a time. New operators typically start by practising each movement on its own, curling the bucket, extending and retracting the stick, raising and lowering the boom, before combining them into one continuous motion. Pushing the joystick that controls the stick forward extends it away from the machine, and pulling it back draws it in, a motion worth practising slowly before attempting a full digging cycle.
Swinging and Repositioning the Machine
The upper structure rotates a full 360 degrees independently of the tracks, which means the counterweight and rear of the machine swing through space that isn’t always visible from the cab. Use the mirrors and any fitted camera to check the swing radius before rotating, sound the horn if people are working nearby, and maintain a safe distance from other workers and structures at all times.
Stopping and Parking Safely
Where practicable, park on firm, level ground and lower the bucket or attachment fully before shutting down, since a raised attachment left unsupported is a hazard. Bring the travel controls to neutral, engage the safety lock lever, and follow the manufacturer’s shutdown procedure, using wheel or track restraints where site procedure requires them.
Excavator Operating Techniques
Digging and Trenching
Position the tracks parallel to the trench line where the site allows, then curl the bucket into the material, drag the stick in while curling the bucket further, lift the boom, and swing to the dump location before releasing the load. Dig in controlled increments rather than a full-depth bite in one pass, since an oversized bucket load slows the cycle more than it speeds things up. Trench depth and reach both depend on the excavator’s size, so Quotor’s guides to excavator sizing and the excavator equipment page are worth checking before matching a machine to the job and hiring one. Backfilling follows a similar pattern in reverse, curling material back into the trench instead of out of it.
Loading and Moving Material
Loading a truck efficiently means keeping the swing angle small, positioning the truck close enough that the bucket needs only a short travel between the dig face and the load area. Line the bucket up over the bed before releasing material rather than dumping mid-swing, and avoid swinging a loaded bucket over the truck’s cab. Dropping it all in one spot unbalances the load and adds extra trips, so spread material evenly across the bed as you go.
Grading and Levelling
The bucket’s broader rear surface can be used for smoothing and back-dragging where appropriate, working in overlapping passes from a known reference point such as a stake or grade line. Small, incremental corrections give a more even finish than fixing the whole area in one pass. A tilt bucket or tilt coupler makes forming crossfall and slopes easier where fitted.
Working on Slopes and Uneven Ground
Keep the bucket or attachment low and close to the ground for extra stability on a slope, since this lowers the machine’s centre of gravity. Travelling directly up or down a slope is often preferable to crossing it side-on, though this isn’t an absolute rule. Where slope work is unavoidable, stay within the manufacturer’s operating limits and site procedure, since ground condition, orientation, attachment position and undercarriage all affect stability.
Building Excavator Operating Skill
Common Operating Mistakes
New operators most often depart from best practices by working one joystick axis at a time instead of combining movements, by taking bucket loads too large, or by misjudging the swing radius near people or structures. Skipping the pre-operation inspection breaks basic safety protocols, and it tends to show up later as unplanned downtime from a hydraulic leak or track issue that a walk-around would have caught early. Operators still building fundamentals can find the full training path in Quotor’s guide to becoming an excavator operator.
Coordinating Boom, Arm and Bucket Movements
Cycle efficiency comes from keeping the bucket moving through a smooth path rather than a series of separate movements. Practising the boom, stick and bucket together, in short repeated cycles, builds the coordination needed to combine them without thinking through each motion individually. Combining movements this way also smooths control inputs for more accurate placement.
Improving Digging Accuracy and Cycle Efficiency
Accuracy comes from repetition on a marked-out area where the result can be checked against a reference line, and from operator training that covers a range of ground conditions across the construction industry rather than one site type repeatedly. For the broader career path, Quotor’s guide to becoming a heavy equipment operator covers what comes next.